Saturday 23 March 2013

Review - AGAT 18k

This is a strange little camera. Made in the Soviet Union in the 80's, it's a manual, half-frame, 35mm pocket camera. Despite it's simplicity, it's a lot of fun to play with.

A lot of it's limitations end up providing noticeable benefits. For example, there's no light meter, so it doesn't need any batteries. It's also very simple mechanically, so it's very small and light.


Working out how to use it though requires a bit of thinking about, unless you read Russian.


The trickiest part about the AGAT is loading the film.  You have to pull the camera apart into two halves and then carefully load  the film can and spool it before putting it back together.  Making sure everything stays in place while you re-assemble the camera can take a couple of tries.


Taking photos is all very simple, and manual.  Firstly set the ISO on the small yellow dial, then select the weather conditions you are shooting under on the top part of the large dial.  Then you need to estimate the distance of your subject to the lens and set this on the focussing ring.  Then shoot.

It all sounds very iffy, but it's surprising how well it works.


Once you use if for a while you appreciate how much thought has gone in to it's design. The lens cap not only covers the lens, but all the exposure dials and the shutter release button.  The front of the viewfinder is mirrored for self-portraits. The hand strap unscrews allowing you to use a standard thread tripod. And, it's half frame, which means you should get twice as many photos from your roll of film.


However, the most interesting part about the AGAT is the look of the photos it takes. Everything comes out looking like you were in Eastern Europe in the Cold War.  Very cool.


Tuesday 12 March 2013

Guide - Develop DISC film at home

Disc film was introduced by Kodak in the early 80's as a replacement for 110 film.  There were a lot of promises made at the time regarding the quality and affordability of the format.  But whilst the cameras were cheap, I don't remember the film and developing costs being any different.  In fact, with just 15 exposures per film it worked out more expensive.  It sold because it was different and made a cheap Christmas present.

The format is totally dead.  You can't buy film or get it processed commercially. (I think there is just one place in Australia charging 20 pounds per disc!)

However it is sometimes possible to pick up expired film on ebay and because the processing is C-41, you can do it at home. You can see my guide to this here.

I've successfully developed film which expired in 1993.


How to develop Disc film

The film is in a cartridge which also contains a shutter or slide to protect the film from light.  This shutter is moved in and out of place by the camera when you load the film.  The first step is to get the film out of the cartridge.


So in the dark, find for the tapered edge of the cartridge and feel for the corners at the opposite end. If you push these away slightly the cartridge should open easily allowing you to access the film.   


Handle it by the plastic hub only and drop it into a standard development tank.  The negative film is much thicker than normal 35mm film so it will stand up ok without buckling.  If you are developing more than one, you can fix them together using a small cable tie through the hole in the hub, just be careful not to scratch the film.


Then you can seal the tank and develop as normal C-41.  Just let the film rattle around and don't bother inverting the tank too much, just swirl it around.  After processing you may notice it has a blue finish.  this will disappear after a few mins.

With any luck you will have some pictures!

Don't be too concerned if the colour of the disc is not as pretty as a lab processed one from the 80's, it will scan digitally just fine.


Guide - Develop Colour film at home

Developing colour film at home is just as easy as developing black and white film.  Whilst it's true that more care is required, most of the steps are the same and you should be able to enjoy good results for a small cost.

Most colour films require a process called C-41.  This process has to be controlled much more carefully than b&w processing.  For the kit mentioned here you need to do the whole development at 30degC (+/- 0.5) and time the development step exactly.

If you've never developed a negative film, you should read my guide to developing black and white film first because I'll refer to it throughout this guide.  Don't feel you have to be experienced at b&w first, by all means jump into doing colour straight away if that's what you're interested in.

You'll need the following items in addition to what you may already have for the b&w processing

  • Tetenal Colortec C-41 developing kit (1lt version)
  • Chemical containers (see below) 
  • Thermometer which covers 20-40 degC 
  • Bucket
  • Aquarium heater (as used for tropical fish tanks)
  • Stopwatch (the one on your phone is fine)


Maybe budget around 40 pounds for the lot.

As you'd expect, getting you film out of it's canister and into the developing tank is just the same as before.  The only difference is how it's processed.   

There are several C-41 developing kits available, most having five or more steps (often called 'baths').  However the Tetenal one has just four even though it's advertised asa two bath kit.  It costs about 17 pounds and will do maybe 16 films.
  • step 1 - develop
  • step 2 - bleach+fix
  • step 3 - rinse
  • step 4 - stabilize
Firstly you need to mix the chemicals.   In the box you will find six small bottles which need careful dilution with tap water.


Like I mentioned in my b&w guide, it's a good idea to buy some cheap cleaning products from Tescos' for the bottles alone.  Wash them out really well with lots of hot water, leaving them to stand for a while whilst full.  This also makes it easier to get the labels off.  You may not get all the smell out, but that's ok.  

For this kit I tried to choose smaller containers which would fit easily in the bucket and narrowed towards the neck of the bottle to minimize the chemicals oxidizing during storage.

You can divide the six Tetenal bottles into three groups.

CD - Colour Developer  - three bottles


BX - Bleach+fiX - two bottles


STAB - STABilizer - one bottle


REMEMBER - Although not highly toxic, you should avoid contact of the chemicals with your skin. I always wear latex gloves though out the whole process. This will also help keep the smell of the chemicals off your skin, and your finger prints off the film.


  • To make the developer solution, add the three CD bottles to 700ml of water
  • To make the bleach+fix solution, add the two bottles to 600ml of water
  • To make the stabilizer, add the one bottle to 900ml of water


Label the separate containers and get them into the bucket with just enough water so that they don't float about.  Also place the developing tank, with your colour film inside, into the bucket so that the water covers it.  You may need to place something heavy on it to keep it in place.

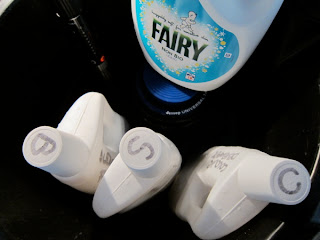
I used a laundry detergent bottle for a weight
Place the Aquarium heater into the bucket and set it to 30degC.  Leave it all to warm up and come to temperature.  You can cheat at this step by using warm water to fill the bucket.

Use the thermometer to check the temperature, don't trust the setting on the heater.  You may find you have to set it a little higher than 30 degC to get the water warm enough.  Once you're sure it's all the same temp, you can start.  Remember, 29.5degC to 30.5degC is ok.

  1. Take the developing tank and the developer bottle out of the water.  
  2. Add the developer to the tank and start the stopwatch.  
  3. Then get the development tank back into the water immediately.   
  4. It needs to be in there for 8 minuets.  
  5. At two minute intervals, remove the tank and invert it four times and then get it back into the water. 
  6. At the end of the 8 mins, pour the developer back into its container! (don't throw it away as it will develop up to 16 films until it's finished) 
  7. Add the bleach+fix solution in the same manner, this time leave it in for 6 mins.
  8. Pour the bleach+fix back into its container, again you can reuse it.
  9. Rinse the tank with several flushes of water.  I follow the same procedure as for b&w development.
  10. Add the stabliser solution for 1min, and again keep it for future re-use.
That's it.  

Don't be tempted to wash the stablizer solution out, it has a 'rinse-aid' type agent in it to help remove the water from the film.  You can now remove the film and hang it to dry.

Hopefully you have some images you can scan. 


Common problems


Rainbow lines on image

This is almost certainly left over stablilser which has dried on the film.  You can fix this easily by washing and drying the film again.  Remember to wipe the film down before you leave it to dry.


Sunday 10 March 2013

Guide - Expired film

Here is the film I used for playing with these cameras and processing the negatives.  I'll add to it as I use more.  In date films are included for comparison.


Ilford FP4 Plus - ISO125 - Expiry date May 2017

Good black and white film which is easy to use and will still give you results if you get your exposure or development a little bit wrong.  I think it gives great contrast and some of my photos have a ghostly glow to them which I struggle to re-create digitally.

Easy to develop in standard Ilford B&W chemicals

Warehouse in Bolton
- Taken using Canon EOS 50e with Ilford PF4 Plus
Kodak Gold - ISO200 - Expiry date Feb 2014

Gives good results if used carefully.  The colours are very faithful but you notice that it's not as flexible as the Ilford FP4 when you scan the images in, so you need to be more careful with exposure and development.

Fairly straight forward to develop in Tetenal Colortec C-41
Olympic postbox in Manchester
- Taken with Blackbird Fly

Fujicolor HR Disc - ISO - Expiry date Jan 1993

For such old stock it hold up well and gives good results.  As with all Disc film the results have a lot of grain and the images are generally poor.  Develops ok in Tenenal Colortec C-41 following the standard procedure, but  my first film had a blue finish which disappeared after an hour.  The developed negative disc doesn't look as good as an original lab processed one from the 80's, but the results scan digitally the same.

Brandon at home
- Taken with Boots 415 Disc camera


Review - Boots Disc 415 Camera

Disc film was an idea from Kodak in the 80's.  The idea was to make cameras smaller and easier to use by using a disc shaped film rather than a roll.  I suspect the real reason was to dramatically reduce manufacturing and film processing costs, because they were no smaller than 110 cameras and no cheaper to buy and use.


I was given a model identical to this by Myrrah for Christmas when I was eleven.  I did use it quite a lot, but the photos were awful.  Technically the film has to have been the worst ever manufactured for consumers and the format was short lived.  My Boots 415 soon followed my old 110 to the bottom of the toy box, never to be seen again.


Like all Disc cameras there are no settings, just load the film cartridge, close the lid and shoot. An indicator on the disc shows you which frame you are on. You can actually open the camera and remove the cartridge mid way through a disc and it's ok.  This is because the cartridge contains it's own shutter to cover the film which is put in place when you pull the lever on the camera.  The model in the photos was a couple of pounds off ebay and it froze up a few times, but it still worked after re-inserting the cartridge.


No lab will process Disc film for you, so you have to do it yourself.  Thankfully it's just C-41 so you can do this at home.  More difficult is buying the film.  It's been out of production for many years and the Disc used below expired in 1993.  Still worked though.


Worst feature - Very small negative frame giving very poor photos.

Best feature - Some of the number graphics on the negative disc look cool.


Brandon and Callum in Manchester -
Taken on a Boots Disc 415 with Fujicolour HR.  Mar 2013


Saturday 9 March 2013

Review - Blackbird Fly 35mm TLR

The Blackbird Fly is a Twin Lens Reflex (TLR) camera which takes 35mm film.  It's very much a plastic toy like camera to play around with, and if you approach it with that in mind, you'll be ok.

They are quite expensive new (70 pounds) so it's worth waiting until one comes up on ebay, I think I paid around 20 pounds.

TLRs use two lenses, one for exposing the film and another for the viewfinder.  The viewfinder is of the waist level type and has some squares for setting up the shot depending on the frame you are using. Although once you're used to the field of view, you'll find you have the same amount of success if you just point the camera and click the shutter.

Settings are basic.  Very basic.  
  • No ISO setting 
  • two aperture settings (cloud and sun), 
  • two shutter speed settings (1/125sec and bulb)
So, like a lot of cameras of this type, either bright sunlight or faster film will help you out.  

Also, the focussing is all guess work.  There are markings on the top dial in meters, just guess the distance to the object.

Loading film is a little tricky, you have to place the roll in a compartment and then spool it.  Once you close the back and start shooting the film advance knob and rewind crank feel very flimsy and plasticky, you definitely need to be careful not to force anything if it feels a little stuck.  Rewinding a film can need a lot of care to be sure you are doing it right.

The camera comes with a couple of inserts which go between the lens and the film.  These allow you to  frame the image onto the negative.  Because I picked mine up cheap, they were missing.  In this case the camera exposes the whole film, including the sprockets, which gives a nice look.  Anyway, you can always crop down your exposed image digitally anyway.

One of the things I like the most is the viewfinder.  It's much easier to get candid shots whilst out and about if it's not obvious you're taking a picture, however the bright yellow case can sometimes ruin this.

Worst feature - Rewinding a film can leave you uncertain it's working.

Best feature - Exposing the sprockets gives the photos a cool look.

Olympic Postbox - Taken using Blackbird Fly on Kodak Gold. Feb 2013


Thursday 7 March 2013

Review - Canon EOS 50e 35mm SLR

If you have a Canon EOS DSLR then it makes perfect sense to pick up a 35mm SLR to play around with.

Most of your lenses will work (more about that later) and you'll find it familiar to use.   The 50e is really cheap at the moment, you should be able to get one for less than 15 pounds easily.  That's 400 pounds less than it was in 1996! (It was called the Elan IIe in the US)


The 50e is has all the automatic and manual modes that the DSLRs have today and they work in exactly the same way.  All the symbols are the same too, so as long as you know Canon, you'll find it really easy.
If you don't know the Canon cameras, then it's easy to pick up a manual for the 50e online (see here).


Loading the film is automatic, just make sure the leader reaches the orange line, and the whole film transport is motorised.  The unit uses a 2CR5 battery, which will last ok as long as you don't overuse the flash.

At the end you can set the camera to rewind the film so that the leader is still there which is useful if you do your own processing. (Set custom function 2, CM02, to '1')
But the best feature is the eye controlled focussing.   Many of the more expensive Canon models at this time had this feature and surprisingly it actually works.  In the viewfinder there are three boxes which, when you depress the shutter button halfway, will set the focus to the one you are looking at.  Magic!  It works better if you calibrate it first, the manual says it's accuracy improves over time.  Most people dismiss this feature on the 50e because there are just three focus points (rather than the seven on the later Canon EOS 30).  However the 50e has another trick that the 30 can't do.

After you've chosen the focus point, keep the shutter button half depressed and look at the small rhombus in the top left of the viewfinder.  This engages the depth of field preview.   I can't think of how many times i've never bothered to check this before taking a shot, this feature makes it second nature.

And remember...over 400 pounds in 1996. ($=£, 1:1 in the nineties)

Worst feature - Short battery life with flash (just 18 rolls!)
Best feature - Eye Controlled DoF preview.

Rowenta Street, Bolton - Taken using a Canon EOS 50e with Tamaron 55-200mm lens.  Feb 2013